

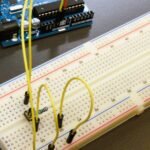
When you first step into the world of electronics, one of the most common tools you’ll come across is the breadboard. Whether you are a student, hobbyist, or someone who wants to experiment with DIY projects, a breadboard makes it possible to build and test electronic circuits without the need for permanent soldering. It’s a simple-looking rectangular board filled with small holes, but behind those holes lies an ingenious design that makes prototyping both quick and easy.
In this blog, we’ll explore what a breadboard is, how it works, the different parts of a breadboard, and a step-by-step guide on how to use it to create your own circuits. By the end, you’ll not only understand the basics but also feel confident enough to build your first project.
What is a Breadboard?
A breadboard is a rectangular plastic board with a grid of tiny holes that allow you to insert electronic components like resistors, LEDs, capacitors, and integrated circuits (ICs). The holes are connected internally by metal strips that create electrical connections. This means you can quickly plug components into the board, connect them with jumper wires, and build a working circuit all without soldering.
The name “breadboard” has an interesting history. In the early days of electronics, experimenters literally used wooden cutting boards (like those used for slicing bread) as a base to hammer nails and connect wires for their circuits. Over time, the modern plastic version was developed and the name stuck.
Why Use a Breadboard?
Before diving into the technical details, let’s understand why breadboards are so important:
- No soldering required – Perfect for beginners who don’t want to deal with soldering irons right away.
- Reusable – You can remove components and reuse the breadboard for countless projects.
- Fast prototyping – Build and test circuits quickly without committing to a permanent design.
- Learning tool – A great way to understand how electronic components work together.
The Structure of a Breadboard
At first glance, a breadboard looks like a simple array of holes, but the internal structure is cleverly designed. Let’s break it down:
1. Power Rails
On both sides of most breadboards, you’ll see long rows of holes, often marked with red (+) and blue or black (–) lines. These are called power rails. They are used to distribute power (positive and negative voltage) to different parts of your circuit.
- The red line usually represents the positive voltage (Vcc).
- The blue or black line usually represents ground (GND).
All holes in each column of the rail are connected internally.
2. Terminal Strips (Main Area)
The middle section of the breadboard is filled with holes arranged in rows. These are where you place most of your components.
- Each row usually has five connected holes on the left of the center gap and five on the right.
- The center gap (sometimes called the ravine) separates the two halves. This space is designed to fit dual in-line package (DIP) ICs.
3. Internal Connections
Inside the breadboard, there are metal spring clips that connect the holes together. This hidden wiring is what allows your components to be connected when plugged into the same row or rail.
How to Use a Breadboard (Step-by-Step Instructions)
Let’s now learn how to actually use a breadboard. Here’s a beginner-friendly guide:
Step 1: Gather Your Materials
Before starting, make sure you have:
- A breadboard
- Jumper wires
- A power supply (like a 9V battery with adapter, or USB power supply)
- Basic components: resistors, LEDs, switches, transistors, or ICs
Step 2: Understand the Layout
Look at your breadboard carefully:
- Identify the power rails on the sides.
- Identify the terminal strips in the middle.
- Notice the center gap where ICs will go.
Step 3: Connect the Power Rails
It’s good practice to connect your power rails first:
- Connect the red rail to your positive voltage (e.g., +5V or +9V).
- Connect the blue/black rail to ground (GND).
This way, you can easily access power anywhere on the board.
Step 4: Place Components
Let’s take a simple example: lighting up an LED with a resistor.
- Place the LED across two rows in the middle section. Remember, LEDs have polarity: the longer leg is positive (anode) and the shorter one is negative (cathode).
- Insert a resistor into the same row as the cathode of the LED, and connect the other end of the resistor to the ground rail.
- Connect the anode of the LED (longer leg) to the positive power rail.
Step 5: Add Jumper Wires
Use jumper wires to make connections:
- From the LED’s anode to the positive rail.
- From the resistor to the ground rail.
Step 6: Power It Up
Now connect your power source (like a 9V battery with a regulator or a 5V USB adapter). The LED should light up, showing that your first circuit works!

Tips for Using a Breadboard
- Check polarity – Some components like LEDs, capacitors, and diodes must be placed in the correct direction.
- Keep wiring neat – Use short jumper wires whenever possible to avoid tangles.
- Avoid loose connections – Push components firmly into the holes.
- Test with a multimeter – If something doesn’t work, check continuity with a multimeter.
- Use color coding – Red for positive, black for ground, and other colors for signals.
Example Projects with Breadboard
Once you master the basics, you can try fun projects like:
- Blinking LED Circuit – Use a 555 timer IC to make an LED blink.
- Light Sensor Circuit – Connect an LDR (light-dependent resistor) to control an LED based on light levels.
- Simple Buzzer Alarm – Build a circuit that sounds a buzzer when a switch is pressed.
- Mini Amplifier – Use a small IC like LM386 to build a basic audio amplifier.
Each of these projects can be prototyped on a breadboard before making them permanent on a PCB.
Common Mistakes Beginners Make
- Wrong placement of components – Not aligning the legs of components with the correct rows.
- Forgetting the resistor with LEDs – Directly connecting an LED to power can burn it out.
- Mixing power rails – Accidentally connecting positive to ground.
- Loose jumper wires – Causing incomplete circuits.
- Overloading the breadboard – Trying to fit too many components without a plan.
Advantages and Limitations of Breadboards
Advantages:
- Easy to use
- No soldering needed
- Great for learning and testing
- Reusable
Limitations:
- Not suitable for high-frequency or high-current circuits
- Can get messy for complex projects
- Components can come loose if handled too much
Final Thoughts
The breadboard is one of the most valuable tools for anyone learning electronics. It gives you the freedom to experiment, make mistakes, and learn without fear of damaging expensive components. By following the simple steps outlined above—connecting power, placing components, and using jumper wires—you can bring your ideas to life in minutes.
Whether you’re building a simple LED project or testing a microcontroller-based design, the breadboard will always be your companion in the journey of electronics. So, grab a breadboard, a few components, and start experimenting—you’ll be amazed at how much you can learn by just plugging things in and watching them work.


After study a number of of the blog posts in your web site now, and I truly like your approach of blogging. I bookmarked it to my bookmark web site record and might be checking back soon. Pls check out my website online as properly and let me know what you think.